Place the numbers 1-9 once in each row, column and 3x3 bold-lined box. This is the standard sudoku rule.
Numbers in dashed-line regions (called cages) must sum to the total given at the start of that caged region.
Numbers cannot repeat within a cage.
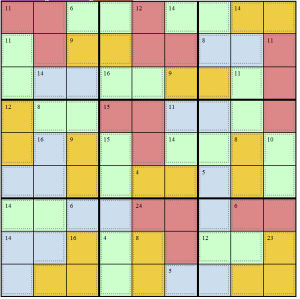
Here is an example start position of a killer sudoku:
If you are familiar with standard sudoku, you will see the one key difference: the introduction of addition into the grid. Whereas in standard sudoku the numbers 1-9 have no numerical meaning, and could be replaced with letters, here they do have significance as numbers too. Look at the top-left of the grid: there is a red cage (dashed-line region) of three squares, that must sum to 11. This means that the values in those three squares could for instance be 2,3,6 as that sums to 11. But they could not be 2,3,7 as that sums to 12 so would not obey the sum total, nor could they contain 3,5,3 as whilst that sums to 11 it repeats a digit and that is against the rules.
If you would like a visual explanation of the rules, here is a video outlining the killer sudoku rules as explained above:
Play A Sample Killer Sudoku Puzzle
If you'd like to have a go at solving the example puzzle above, then you can do so for free online with our Online Killer Sudoku Puzzle Player
If you enjoy this puzzle type, you can join our online Puzzle Connoisseur's Club for £12 or $17 a year and play a new Kakuro Puzzle puzzle every day of the year, together with many other fun and interesting logic puzzles.
Strategy and Solving Tips for Killer Sudoku
Killer sudoku puzzles are trickier than standard sudoku. It is not uncommon to spend quite a lot of time to begin with working out possible values for squares, rather than
necessarily placing numbers straight away as may be the case with a standard sudoku. However they can all be solved without any guesswork, just logic is required to reach the unique solution. Here are some solving tips:
Look for cages that have only one option and pencilmark those values in the grid. Look at the 23 at the bottom-right of the grid, this can only be made from 9,8,6 in three squares, so you can pencilmark 9,8,6 into the three squares in that yellow 23 cage straight away. There's also a 24 cage from three squares elsewhere in the grid: can you find it and pencilmark the only possible options into its three squares?
Remember to use standard sudoku logic when solving: for instance now you know that the bottom-right 3x3 square must contain 6,8,9 in the 23 cage, the other squares can only contain 1,2,3,4,5,7. But which of the squares can actually contain these values? Based on the sums, you will see that the 7 can only be placed in the green 12 sum of two squares. If one of the squares must be the 7, then the other must be 5, so you can pencilmark 7 and 5 into these two squares. That only leaves you 1,2,3,4 as the options for the other squares in the box. And since the 6 from two cage cannot be 3,3 then that must be 2,4 leaving 1,3 as the options for the final two squares that are part of 5 from 2 boxes.
Another rule that can be used and can often help you make some early progress is called the rule of 45. This takes advantage of the fact that in a 9x9 grid the numbers 1-9 sum to 45. Therefore the numbers in each 3x3 cage must sum to 45. To see how this can be helpful, take a look at the bottom-left 3x3 box in the grid. You will see that there are four sums in that box: 14, 14, 16 and 6. But three of those sums are fully-contained within the box, so whilst we don't know the exact numbers in them, we know that those eight squares in the box must sum to 14+14+16 = 44. Therefore the one remaining square in that 3x3 box (its top-right square) must contain 45-44 = 1, and so we can place a 1 straight into it. Very useful! That then enables us to remove the 1 as an option from the 1,3 in the top-left square of the bottom-right 3x3 box that we were just working on in the previous strategy tip, and then place a 1 in the bottom-left square of that 3x3. We're making good progress!
If you'd like to see a visual explanation of the rule of 45, then here is a video that goes through what we've just outlined above: